
All About Gourds
What are Gourds?
A “gourd” is the fruit of certain plants in the family Cucurbitaceae, these plants are divided amongst the Lagenaria and Cucurbita genera. Lagenaria gourds are the large, “hardshell” variety whilst those belonging to Cucurbita are the small, (often brightly coloured) ornamental types typically found in the autumn at pumpkin farms and fall fairs.
The larger, hardshell gourds of Lagenaria are harvested after the first hard frost and dried outdoors over winter. In spring they are collected and cleaned, ready for crafting. While the smaller Cucurbita gourds can be crafted, they are often picked too soon and either rot before they finish drying properly, or their dried shells are too thin for crafting.
Growing Gourds in a Northern Climate
Northern Grow Guide
Gourds are a member of the Cucurbitaceae Family. It is a very large classification that also includes squash and melons. There are two main types: soft shelled gourds, often referred to as ornamentals and hard shelled gourds.
Soft shelled gourds (cucurbita pepo) with their bright colours and unusual shapes are common in the fall at fruit and vegetable counters. They are used for decorations during the Thanksgiving season. Most of these gourds will wither and eventually become compost. Soft shelled gourds are relatively easy to grow in the north, generally taking about 70 days to maturity.
Spring – Starting the Season
To be successful in gourd growing in northern climates we strongly suggest that you start your seeds indoors. To reach maturity gourds require 110-140 days so we need to give them as much time as possible. Sowing directly into the ground will most often produce a final fruit that has not reached maturity and will eventually collapse and rot during the drying process. Our recommendation is that you start your seeds six weeks before your proposed plant date.
Before planting, gourd seeds should be soaked in pure water for 24 hours. Avoid using water that has been modified with a water softener. Gourd seeds are very thick and woody and this soaking will soften the shells and aid both the rate and the speed of germination. We suggest you use either a pot or pie plate and cover the seeds completely with water.
With small quantities of seeds consider sprouting the seeds between paper towels and place them in a warm and dark place. Always keep the paper towels moist (NEVER LET THEM DRY OUT). Once the seeds have sprouted transfer them to peat pots. For larger quantities sow seeds directly into peat pots after soaking.
Use good quality potting soil mixed with vermiculite and peat to improve drainage. Do not use garden soil as it will increase the likelihood of problems with weed, pests and diseases. Plant 2 seeds per 3” peat pot. The 3” pot is large enough to handle the vigorous root growth and will get you through to transplanting time. Any smaller pot may result in your seedlings becoming root bound and not growing at as rapid a rate. From our experience it is best to lay the 2 seeds sideways in the peat pots far from each other. Cover with 1/4” of soil. Water the soil well before and after planting. Keep the pots warm and moist in full sunlight or use a grow bulb during the sprouting period. Sprouting times can vary between 5 to 30 days depending on the variety and the thickness of the shells. Be patient and give them as much heat, light and water as you can.
Preparing the Soil
Hard shelled gourds are a heat loving plant and should only be planted in areas that receive full sun. Gourds are very heavy feeders and love rich composted areas. Gourds prefer a slightly acid soil (PH of 6 – 6.5). They require lots of potash and it is best to work in either potash or wood ash.
Planting Time
Do not plant until all danger of frost has past! Your seedlings are now anywhere between 6” to 18” in length. Water the seedlings well before transplanting. Space the plants at least 6 ft apart. Dig the hole deeper and wider than the plant requires and refill hole with loose soil. This will assist the roots into moving into its new environment. Water the transplant to assist the settling in process.
Once the plants have settled in they will start their rapid growth. At this early stage they require nitrogen and should be fed anything from a fish fertilizer, manure tea or commercial fertilizer. Plenty of water and the right amount of nutrients will encourage them to reach the desired length of 10 ft.
If the weather has been hot and sunny within 6 weeks of transplanting your gourds should be producing many flowers. Gourd flowers are white, night blooming and last only one night. They are plentiful throughout the summer.
In order to ensure a good gourd crop it is essential that you hand pollinate in the evening using a small paintbrush or Q-tip.
Fruit that is pollinated later than 8-10 weeks after transplanting is less likely to produce fruit that will reach full maturity.
Gourds are ready to harvest when the stems have turned completely brown. Even then we leave all our gourds in the field until we receive a killing frost.
Drying Gourds
Gourds will loose over 90% of their weight during the drying process. They require a great deal of air movement to remove all the water inside them. They are not affected by cold and freezing temperatures.
Most gourds harvested in late October are dry enough for crafting by the following May. Many will turn black and moldy. This is a normal part of the drying process.
Those that have not reached full maturity will collapse and rot.
Special thanks to Peter Bell of Northern Dipper
Harvesting Gourds
Harvesting Tips
To the first time grower a very important question is “When do I harvest my gourds?” and “What do I do with them once I do harvest?” The key to drying gourds is good air circulation. You do not want to harvest them too early, do not take them in the house to dry and don’t, under any circumstances, bore holes in them to hasten the drying process. Bacteria will get in that hole and the chances are very good you will lose that gourd.
As the gourds dry they will turn from green to tan. There will be a dark black mold and a white waxy skin which will develop during the drying process. A gourd contains a lot of water and it evaporates through the shell. This is what causes the mold. The mold is what causes all the beautiful patterns in the dried shell so don’t throw them away thinking they have rotted…they should be moldy!
At this time of year the gourds are large and to some they may look mature. They are not however mature enough to pick. DO NOT PICK ANY GOURDS UNTIL AFTER THE FIRST HARD FROST which in most places in Canada is October. For those of you that trellised you can leave your gourds on the vine all winter. The ice and snow does not hurt them and actually aids in the drying process.
For those of you that grew on the ground you will want to cut the gourd from the vine (after the vine is totally dead) leaving 3 – 4″ of stem. If the stem breaks off it is not a tragedy but try to be gentle so you do have a stem. Put your gourds up on wooden pallets or on chicken wire. This will allow the air to circulate around the gourd. Throughout the winter you may want to turn your gourds but this is not essential. I normally go out once a month and turn the large ones – the small ones I don’t bother with. Good luck everyone…just remember good air circulation is the key. If you follow the few simple instructions you will have beautiful dry gourds in the spring just waiting for crafting!
Pam Grossi, Northern Dipper Farms – From Canadian Gourder, October 2003
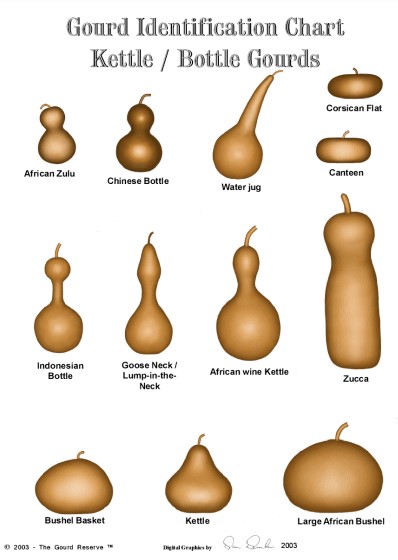
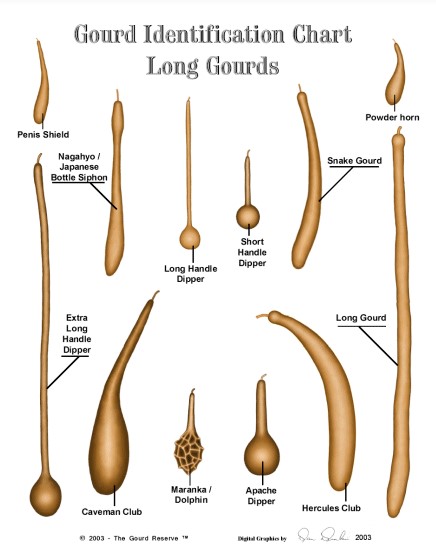
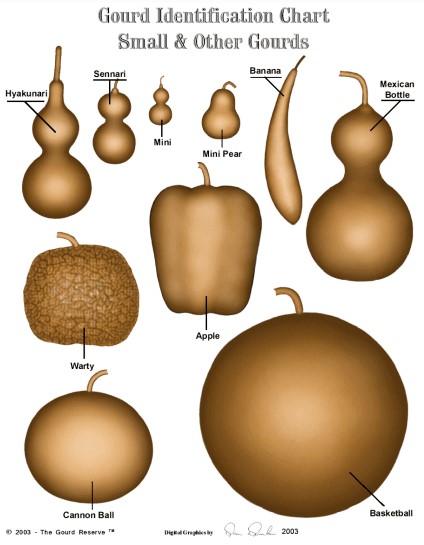
Digital Gourds chart © Dan Dunkin 2003
This chart is used courtesy The Gourd Reserve